Posts

Showing posts from March, 2019

Marking in VIM Editor

In this post, we will see how to mark a particular cursor position in VIM Editor. This is really helpful while navigating through a file. Set mark a at current cursor location ma m stands for marking and a represents register in which cursor location is stored. It can be any register. Jump to marked cursor location 'a :  jump to line of mark a (first non-blank character in line) ~a :  jump to position (line and column) of mark List all the current marks :marks 
Tab concept in VIM Editor

Why use tabs? I would prefer using tab concept because I can use most common operations(Copy, Cut, Paste etc..) among different tabs. Let me elaborate above sentence, Let's say you have opened two files - vim file1 and vim file2 You have copied or yanked something through y key from file1 . Now if you want   to paste(p)  that in file2 , VIM won't allow you to do that in this case because of two different vim sessions or instances but pasting of text can be done if you open these files in two different tabs. This post will describe most commonly used tab operations in VIM Editor. How to open multiples files in different tabs? vim -p file1 file2 Command mode operations :tabnew {file} --- open specified file in a new tab :tabedit {file} --- edit specified file in a new tab :tabclose --- close current tab :tabclose {i}  ---- close i-th tab :tabonly ---- close all other tabs (show only the current tab) :tabs ---- list all tabs including the

Search and Substitute in VIM Editor

This post  will show yo u, how you can easily search and substitute in VIM Editor. Below are some mostly used operations: Search /{string} : search for string * : search for other instances of the word under your cursor n : go to the next instance when you’ve searched for a string N : go to the previous instance when you’ve searched for a string ; : go to the next instance when you’ve jumped to a character , : go to the previous instance when you’ve jumped to a character Substitute s : substitute from where you are to the next command (noun) S : substitute the entire current line :%s /foo/bar/g --- Change “foo” to “bar” on every line :%s /foo/bar/gc  --- Interactive change “foo” to “bar” on every line :s /foo/bar/g --- Change “foo” to “bar” on just the current line :s /foo/bar/gc  --- Interactive change “foo” to “bar” on just the current line

Replace default splash screen in Yocto

Image
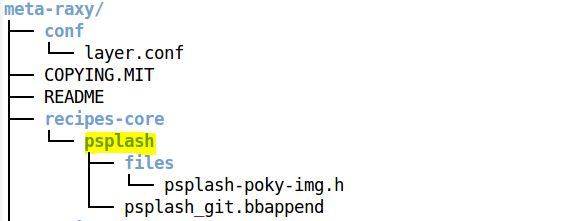
On boot, if you have observed a splash screen with yocto logo appears in core-image-sato. This post is all about to change that splash screen with your own customized image.  Splash screen is handled by a recipe called psplash found under "poky/meta-poky/recipes-core" directory of the source tree.  Since psplash expects an image to be in header file format, first you need to convert your image into a header file format by using script called "make-image-header.sh" Here is what  make-image-header.sh contains, source -  http://git.yoctoproject.org/cgit/cgit.cgi/psplash/tree/make-image-header.sh You could replace your generated image header in  poky/meta-poky/recipes-core/psplash/files with existing one but I would recommend to create a recipe in your own layer and add this image file there. Steps to be followed, Get your own splash screen image(I took .jpg image) Convert that into header file by using script described above ./ make-image-header.sh &

VIM Over VI

VI was written in 1976 by Bill joy and released in 1978 whereas VIM(VIMproved) was written by Bram Moolenaar and released in 1991. As name implies VIM is improved or extended editor of VI editor or we could probably consider VIM as a super set of VI.  Some Extended features in VIM Editor are : Vim has been ported to a much wider range of OS's than vi Vim includes support (syntax highlighting, code folding, etc) for several popular programming languages (C/C++, Python, Perl, shell, etc) Vim can be used to edit files using network protocols like SSH and HTTP Vim includes multilevel undo/redo Vim allows the screen to be split for editing multiple files Vim can edit files inside a compressed archive (gzip, zip, tar, etc) Vim includes a built in diff for comparing files (vimdiff) Vim includes support for plugins, and finer control over config and startup files Vim can be scripted with vimscript, or with an external scripting language (e.g. python, perl, shell)

VIM as a language

Have you ever thought, VIM can be interpreted as a language like any other language? YES, It can be. This post will explain, HOW? Like any other speaking language, VIM has its verbs, modifiers, nouns etc. Let's look at each one of these and then try to build  a sentence out of them. Verbs Verbs are the actions we take, and they can be performed on nouns. Here are some examples: d: delete c: change y: yank (copy) v: visually select Modifiers Modifiers are used before nouns to describe the way in which you’re going to do something. Some examples: i: inside a: around NUM: number (e.g.: 1, 2, 10 ) t: searches for something and stops before it f: searches for that thing and lands on it Nouns In English, nouns are objects you do something to. They are objects. With vim it’s the same. Here are some vim nouns: w: word s: sentence ): sentence (another way of doing it) p: paragraph }: paragraph (another way of doing it) t: tag (think HTML/XML) b:

Copy, Cut and Paste in VIM Editor

Copying, Cutting and Pasting are top most three operations people use excessively. According to my knowledge VIM has made these operations extremely easy as compared to other editors. Here is how those are used: Copying text y: yank (copy) whatever’s selected yy: yank the current line Cutting text Cutting text is simple: it’s the same as deleting. So whatever syntax you’re using for that, you’re actually just pulling that deleted text into a buffer and preparing it to be pasted. dd: delete the current line x: exterminate (delete) the character under the cursor X: exterminate (delete) the character before the cursor Pasting text p: paste the copied (or deleted) text after the current cursor position P: paste the copied (or deleted) text before the current cursor position] You could use MODIFIERS & NOUNS  along with above operations which make your task so easy. I will give you a small example here, 1. How to delete a "communication" word

Navigation in VIM Editor

Navigation in VIM is so easy and handy. Almost all the operation are used by only ONE keystroke, Don't you believe this? Go through this post... Basic motions j: move down one line k: move up one line h: move left one character l: move right one character Moving within the line 0: move to the beginning of the line $: move to the end of the line ^: move to the first non-blank character in the line t": jump to right before the next quotes f": jump and land on the next quotes Moving by word w: move forward one word b: move back one word e: move to the end of your word W: move forward one big word B: move back one big word Moving by sentence or paragraph ): move forward one sentence }: move forward one paragraph Moving within the screen H: move to the top of the screen M: move to the middle of the screen L: move to the bottom of the screen gg: go to the top of the file G: go to the bottom of the file ^U: move up half

Insert a line with single keystroke in VIM Editor

If you are familiar with Vim Editor then you may know that inserting a blank line is quite different from other editors(e.g. gedit) and tedious too. So to make it more easy and handy I have mapped this operation with minus(-) and plus(+) keys trough  map command  of vim. nnoremap + m a o <esc> ` a nnoremap - m a O <esc> ` a nnoremap means normal non-recursive mapping. So whenever + or - key is pressed, vim does following: ( m ) marks current position and saves it in ( a ) register Insert a blank line below in case of plus sign( o ) and above in case of minus sign ( O )  Go back to Normal mode( <esc> ) because O or o takes you into insert mode Navigate to previously marked position which was in ( a ) register If you want to map a key for only one Vim session temporarily, then you don't need to save the map command in a file. When you quit that Vim instance, the temporary map definition will be lost. If you want to restore the

Ctrl+s to save changes in VIM Editor

In Vim editor if we want to save changes, typically we have to get into command mode by typing ":" and type "w" to save changes to file from current buffer but  I always wanted to save my changes with  ctrl+s . So, I have mapped writing operation of "w" with ctrl+s with following commands,   nnoremap <C-s> <Esc>:w<CR>   vnoremap <C-s> <Esc>:w<CR>   inoremap <C-s> <Esc>:w<CR> If you want to map a key for only one Vim session temporarily, then you don't need to save the map command in a file. When you quit that Vim instance, the temporary map definition will be lost. If you want to restore the key maps across Vim instances, you need to save the map definition command in a . vimrc file normally present in  $HOME. That's it !!! Let me give you brief what these mean, The general syntax of map command is (from vim.fandom.com) , {cmd} {attr} {lhs} {rhs} where {cmd}

Convert Human Readable Date & Time to Epoch program in C language

In order to convert human readable date & time into seconds since Epoch in Linux, mktime function can be used. mktime takes struct tm as an argument and returns time_t which is nothing but seconds since Epoch. Here is the program which does this job,

Convert Epoch to Human Readable Date & Time program in C language

Whenever we want to get a date and time from system in Linux, we use time system call which returns the time as the number of seconds since the Epoch, 1970-01-01 00:00:00 +0000 (UTC). In order to convert these seconds to human readable format we can make use of ctime system call as given in below program,

How to include a simple C file in Yocto image by creating your own layer?

Image
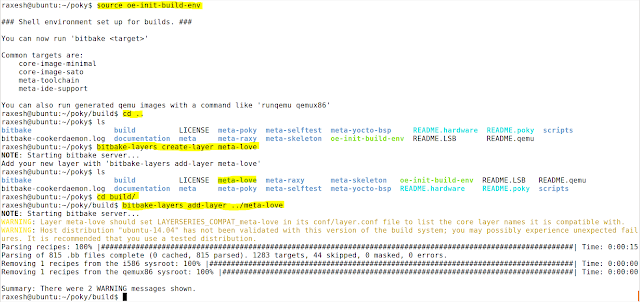
In this post, I will explain about creating your own layer in Yocto and then creating a simple C file which gets included in your final image(core-image-minimal). So, first we will understand how to create your own layer in Yocto and then adding a simple C application into an final image. Create your own layer Basically there are two ways to create your own layer in Yocto: Manually  through Bitbake script I will create a layer through Bitbake which is quite simpler and easier than doing it manually. Assuming you have poky project downloaded from yocto's website,  Navigate to poky project and set environment by running  source oe-init-build-env Now you got moved to " Build " directory, if you want to create a layer where other defaults layers(e.g. meta-poky etc.) are present then run " cd .." Create a layer by running " bitbake-layers create-layer <meta-newlayer>"  Navigate to build directory and run "bitbake-