Posts

Showing posts from December, 2018

Delete partitions & MBR/GPT on disks

Image
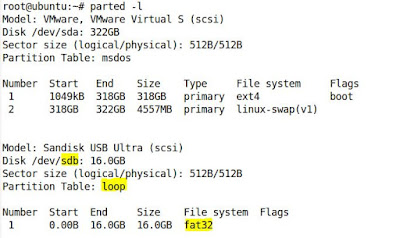
So far we have seen how to create MBR or GPT and partitions on any mass storage disk. If you do not know then refer my two previous posts: MBR partitioning with 'parted' utility GPT partitioning with 'parted' utility In this post, we will delete partitions present on disk as well as delete MBR/GPT on disks. Please note that the process of deleting partitions is same for both MBR/GPT. Delete partitions on disk In order to delete a partition with parted utility,  rm command  is used. Before we delete a partition make sure it *must* be un-mounted because we cannot delete a mounted a partition. Let's see it. The rm command needs partition number. we can view partition number from print command. As we saw before, run parted /dev/sdb to get into parted mode Run print command to view partition number Run rm <partition_number> e.g. rm 1  will delete 1st partition Run print command and you no longer see partition 1 because it has been d

GPT partitioning with 'parted' utility

Image
GPT is the new developed partitioning scheme as opposed to MBR. GPT allows us to create up to 128 partitions. It does not  divide partitions in primary, extended and logical like we have seen in our previous post. I would strongly recommend to go through my previous post before you proceed further. In previous post I have thoroughly explained about parted utility. Continuing with previous post , our goal here is to, Create a GPT on USB disk Create partitions Create a GPT on USB disk On terminal, run  parted /dev/sdb  which takes you into parted mode showing parted version number and welcome message Run  print or p  in parted mode which shows disk information on which all your operations will be performed. This is to make sure that you are not doing any unwanted or unexpected with your desired disk. So, I would say check  print  command to avoid any future undesired circumstances. Now create a partitioning scheme or label(in other terms) with  mklabel,  it asks

MBR partitioning with 'parted' utility

Image
As you might know, linux provides a very handy utility i.e. parted to create, destroy, resize, move and copy(and much more) partitions. So, in this post I will explain how parted is used to create partitions for MBR scheme. Let's commence with some pre-requisites, Machine running linux to perform operations Any storage device like HDD, USB etc. on which we will perform various operations I am using USB stick for this purpose and will carry out all operations on that. I strongly recommend you to use a external disk which doesn't have any important data and if it has, you must take backup before performing any of the following operations. If you do not have much idea about MBR partitioning schemes, Please refer this post first to get basic understanding of disk partitioning. NOTE: You need to have root permission to carry out all the following operations. First thing we do here is to check what's there inside the storage disk. We insert USB drive t

Disk Partitioning: MBR vs GPT

Image
What is disk partitioning? Disk Partitioning is a process of creating different regions or blocks, commonly referred as partitions of mass storage devices like fixed disks and removable disks. Why disk partitioning is required? The whole purpose of Disk Partitioning is to let Operating System(OS) manage information/data in each region/partition separately. There are two different disk partitioning schemes as follows: MBR (Master Boot Record) GPT (GUID Partition Table) MBR (Master Boot Record) MBR is a special type of boot sector resides in partitioned mass storage device. The concept of MBR was publicly introduced in 1983 with PC DOS 2.0 (From Wikipedia). Conventionally, sector size is 512 bytes and first sector of any storage drive contains MBR if that drive is partitioned with MBR scheme. MBR holds minimum boot loader code, primary/logical/ extended partition entry information, file system type, boot signature etc. The structure of classical MB

Where is BIOS Stored?

Image
From the Wikipedia Article on BIOS: BIOS software is stored on a non-volatile ROM chip on the motherboard. In modern computer systems, the BIOS contents are stored on a flash memory chip so that the contents can be rewritten without removing the chip from the motherboard. This allows BIOS software to be easily upgraded to add new features or fix bugs, but can make the computer vulnerable to BIOS rootkits. ROM is read only, so why can the BIOS contents be rewritten? Does the “flash memory chip” mean the same thing as the “non-volatile ROM”, both meaning where BIOS is stored? SuperUser contributor Varaquilex has the answer for us: ROM is read only, so why can the BIOS contents be rewritten? The BIOS program itself is stored in an EEPROM (which can be [E]lectrically [E]rasable and [P]rogrammable [R]ead [O]nly [M]emory) or flash-memory. So the read-only here is about the chip being non-volatile. The contents of the memory stays when the power is cut off, unlike vol

Reset a password in linux without knowing old password

Image
Steps to reset a password in linux:  1.  Reboot your PC 2. Hold SHIFT key during boot to start GRUB menu 3. Highlight your linux image using up-down arrow keys  e.g. Ubuntu, with Linux 3.19.0-rc1 4. Press 'E' to go into edit mode 5.  Find a line starting with  linux  and append rw init=/bin/bash  at the end of that line as shown below 6. Now, Press Ctrl+X to boot, you would see a command line Interface something like below 7. Type in passwd username e.g. passwd raxesh 8. You will be asked to Enter new UNIX password, set your password 9.  Type reboot, If that doesn't work, hit ctrl+Alt+Del You might be thinking that it is a security vulnerability. Actually  It is not . Because one should have physical access to the computer to do this. If someone has physical access to your computer then he/she could do far worse than just changing a password.

vimrc customization

Here is the copy of my .vimrc file. Hope this would help you as well. " User - Raxesh Oriya " --------------------------- " Map ctrl+s to save changes   nnoremap <C-s> <Esc>:w<CR> vnoremap <C-s> <Esc>:w<CR> inoremap <C-s> <Esc>:w<CR> " Remove all trailing whitespace on F5 key press nnoremap <silent> <F5> :let _s=@/ <Bar> :%s/\s\+$//e <Bar> :let @/=_s <Bar> :nohl <Bar> :unlet _s <CR> " highlight when 80 characters crossed  highlight OverLength ctermbg=red ctermfg=white guibg=#592929 augroup vimrc_autocmds     autocmd!     autocmd BufEnter,WinEnter * call matchadd('OverLength', '\%>80v.\+', -1) augroup END " Map Ctrl+c to copy contain in clipboard register vmap <C-c> "+y " Map Ctrl+x to cut contain in clipboard register vmap <C-x> "+d " Set relativenumber so I don't need to count th