MBR partitioning with 'parted' utility
As you might know, linux provides a very handy utility i.e. parted to create, destroy, resize, move and copy(and much more) partitions. So, in this post I will explain how parted is used to create partitions for MBR scheme.
Let's commence with some pre-requisites,
- Machine running linux to perform operations
- Any storage device like HDD, USB etc. on which we will perform various operations
I am using USB stick for this purpose and will carry out all operations on that. I strongly recommend you to use a external disk which doesn't have any important data and if it has, you must take backup before performing any of the following operations.
If you do not have much idea about MBR partitioning schemes, Please refer this post first to get basic understanding of disk partitioning.
NOTE: You need to have root permission to carry out all the following operations.
First thing we do here is to check what's there inside the storage disk. We insert USB drive to linux machine, open the terminal and run parted -l as given below,
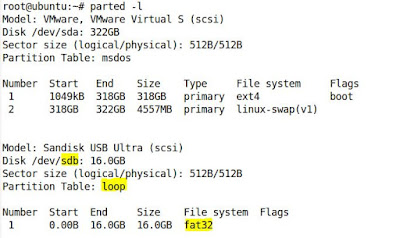
So here you could observe two disk entries. 1st is for system HDD and 2nd one is for USB which I just have connected to my system.
Let's understand different field,
Model - It gives the details of manufacturer and interface used by disk in bracket, here SCSI(Small Computer System Interface)
Disk - This field shows device disk name detected by linux device drivers. e.g. /dev/sda, /dev/sdb followed by disk size.
Sector Size - We are not concerned about this field here but you could read this info in my another post.
Partitions Table - This is the information we are looking for. This field shows under which partitioning scheme a disk is created. "dvh", "gpt", "loop", "mac", "msdos", "pc98", "sun" are different schemes but we are only concerned below three:
- msods - MBR partitioning scheme
- gpt - GPT partition partitioning scheme
- loop - Raw disk access without a partition table
Followed by all these fields, it shows what all partitions are present on a disk with starting address, Ending address, size of partition, file system of partition in which partition was formatted and flags like lba, boot etc.
From figure, we can take following implications:
- Hard disk(/dev/sda): This was partitioned with MBR scheme as Partition table shows "msdos". It has two primary partitions and one was formatted with ext4 file system and another was with swap. One thing to note here is flag shows "boot" which means that partition is bootable partition having bootloader code.
- USB drive(/dev/sdb): It shows "loop" as "Partition Table" which means disk was neither partitioned with MBR nor with GPT but it has one partition formatted with fat32 file system.
Moving further we will only consider USB drive(/dev/sdb) for all required observations.
Our goal is to,
- Create a MBR on USB disk
- Create partitions
Create a MBR on USB disk
- On terminal, run parted /dev/sdb which takes you into parted mode showing parted version number and welcome message
- Run print or p in parted mode which shows disk information on which all your operations will be performed. This is to make sure that you are not doing any unwanted or unexpected with your desired disk. So, I would say check print command to avoid any future undesired circumstances.
- Now create a partitioning scheme or label(in other terms) with mklabel, it asks for label type since we want MBR, we'll give msdos, it warns you saying your data will be destroyed... just verify once your disk(/dev/sdb) and then type Yes.
That's it !! parted has created MBR on /dev/sdb. Check this with print command, Partition Table now shows as msdos which was loop before.
NOTE: After typing msdos if you get this message Warning: Partition(s) on /dev/sdb are being used, don't worry just unmount your disk with umount /dev/sdb and you are ready to go because parted doesn't allow to perform operation on mounted disk.
All above commands are shown here,

If you observe, we have created partition table but there is no actual partition in the partition table which means it is empty. We will create partitions now.
Create partitions
- On parted mode, run mkpart which is used to create a new partition
- It asks for partition type, file system, start size and end size. Give appropriate parameters as shown below. Choose default FIle system type by pressing ENTER key as we are not creating any file systems now.
- I have created 1 primary partition and 1 extended partition, under extended partition I have created one logical partition since extended partition is used to create all allowed logical partitions. In MBR you can create max four primary partitions and you if you try to create 5th one it gives Error: Can't create any more partitions.
- You can see from last print command, we have successfully create partitions in /dev/sdb.
- Run quit command to exit from parted mode

Notes:
- MB is considered as default unit if we do not wish to specify while giving size (see the creation of extended partition)
- You could 0% for staring address of disk and 100% of ending address of disk (I have used 100% while creating extended partition)
- Always start first partition with 1MB even only first 512 bytes are used to store the MBR data. This way we can avoid several entry point errors.
- All logical partitions will be created in extended partition. The sum (of size) of all logical partitions cannot go beyond the extended partition.
- We are allowed to create up to 15 logical partitions

Best Casino Sites - Lucky Club Live
ReplyDeleteLucky Club is one of the most popular online casino 카지노사이트luckclub in the world. As such, it has a vast variety of casino games. It offers a wide range of